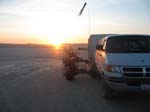
What to Bring:
Your first day will be full of challenges and thrills. A little pre-planning will help ensure that your first lesson is enjoyable.
While powered paragliding in a TrikeBuggy is not a strenuous sport, your first day will insvolve some exercise as you learn to control the trike and inflate the glider on the ground and reset the glider for your first flights. So bring lots of water and some high-energy snacks to keep your endurance up.
The proper attire for your first lessons includes protective, comfortable clothing, including jeans, a long sleeve shirt, and ankle protection (hiking boots, etc.).
Bring a camera, bring a friend, and make this a day of adventure and memories!
Paragliding
A paraglider is an aircraft with no rigid structure. Its beauty is in its convenience and ease of flight. It can be carried in a backpack, set-up in moments and is capable of foot launching from a hillside and achieving soaring flight.
Paragliders fly because they glide through the air. Gravity means they are always gliding down. In perfectly still air the paraglider will descend at about 200 feet per minute. More importantly, they also glide forward through the air at about six feet for every foot of vertical drop (approx 6:1 glide ratio).
The only way to stay aloft or ascend in a paraglider is to soar in air that is rising (thermal or ridge lift) faster than the paraglider is sinking, or to attach a paramotor to the glider.
Powered Paragliding
This remarkable new form of flight allows the pilot to carry in their trunk, a portable aircraft, capable of launching from flat ground, even when there is no wind blowing at all! In a powered paraglider, the motor pushes the pilot forward, raising the angle of attack of the wing relative to the ground, resulting in a gentle climb. When the engine stops pushing us, we simply glide down and land.
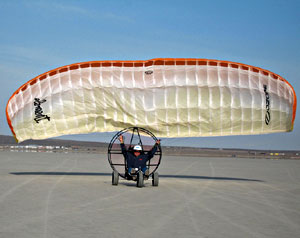
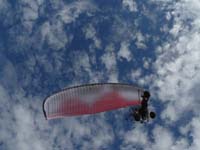
The TrikeBuggy
A PPG Trike is simply a powered paraglider backpack motor unit mounted to a three or four wheeled foot steerable trike, using a standard paraglider wing to achieve flight. The TrikeBuggy is around 130 pounds including the motor and trike. Motor size is anywhere from 100cc to 325cc, and the backpack motor is removable for foot-launched flight as well (with the same wing). The TrikeBuggy allows a pilot to launch and land without having to carry the paramotor on their back. They simply roll into flight!
 The Paraglider The Paraglider
There are a number of proven paraglider designers/manufacturers in the world, each striving to combine in their gliders the highest levels of safety and performance. Their paragliders are certified in Germany and issued DHV ratings. These numbers indicate the level of pilot input that will be required to recover from collapses and stalls.
Unforunately, there are more and more individuals driven only by profit who are copying gliders and offering them for sale for less. A change in material or lines can completely change the way a glider reacts, compromising it's safety. Without a new DHV test, these gliders are not to be trusted with your life. Many of these do not even offer a recommended weight range! A certified glider will have a placard attached that includes the manufacturer, model, date of manufacture, DHV rating and the tested weight range. Look for a placard on your new wing!
A beginner wing (DHV 1) will offer the highest level of safety but will likely have a lower glide ratio and overall performance. An advanced wing (DHV 2/3 or 3) will require a great deal of pilot input to recover from collapses and stalls but will generally be faster, have a better glide ratio, and maneuver more quickly.
It is of the utmost importance to fly a wing that is within your skill range. Therefore, during your first few lessons, you will fly a DHV 1 glider and when you are ready to move ahead, your instructor will have you demo a number of gliders from reputable dealers and help you choose the glider that is best for you. No matter what brand of paraglider you are flying, there are certain aspects that will remain the same. A familiarity with this equipment and terminology will be helpful for your first day of lessons.
- The Canopy is made of 2 layers of synthetic materials, designed to be lightweight yet maintain a low porosity for the life of the glider.
- The Upper Surface of the glider is the top surface during flight.
- The Under Surface of the glider is the attachment surface for the lines.
- The front of the wing is called the Leading Edge.
- The leading edge is made up of openings called Cells. Gliders have varying numbers of cells based on size and performance.
- Between the cells are Crossports - holes in the intercell walls that allow air to pressurize across the wing when inflating and during flight.
- The rear of the wing is called the Trailing Edge. This edge is sewn closed.
- Descending from the canopy, towards the harness are the Lines.
- The lines are attached to Risers, depending on their orientation on the wing.
a. A Risers (the most forward set of risers) may be a single riser or split risers. They are connected to the lines that attach to the leading edge of the glider. The A risers and lines are used to accelerate the glider while kiting.
b. B Risers (the middle set of risers) offer stability and form to the wing. They are also used in advanced maneuvers.
c. Rear Risers gather the lines that are connected to the trailing half of the glider. They normally are the attachment point for the brake line and toggle as well. The Rear risers and lines are used to decelerate the glider when kiting.
- Toggles (often referred to as the brakes) when detached from the rear risers can be used to turn the glider as well as to decelerate the glider. The brake toggles are attached to the trailing edge of the wing. They are the primary means of directional control. When running forward or in flight gently pulling the left or right brake will turn the glider in that direction.
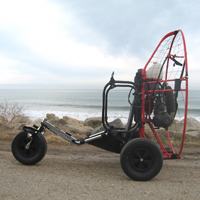
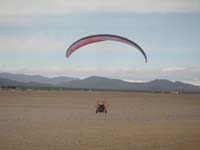
The Trike
The TrikeBuggy is a simple three wheeled cart with attachments to secure your paramotor behind you. You simply lay out the glider, preflight the trike and motor, attach the risers, sit down, buckle up and go flying! It is a great way to enjoy flight when the wind is calm, or if you have challenges carrying or running with the motor unit on your back.
- The Trike Steering on the ground is done by your feet, which pivot the front wheel(s) by pushing gently.
- The Wheels are made for all-terrain: lumpy dirt, sand, low grass, etc.
- The Motor Attachments must be secured to the motor and checked before each flight.
- The Paraglider is attached to the TrikeBuggy, and the pilot is seated and fastened into the Buggy with a seat belt.
- The pilot attaches the paraglider risers to Caribiners on each side of the TrikeBuggy Power Loops. The lines are held by "ears" that keep the lines
at the 3 and 9 o'clock positions onthemotor cage.
- The Paramotor will provide the power to push the TrikeBuggy and pilot forward to inflate the glider and power it into flight.
Setup
Before you fly you will want to do a complete setup and preflight check. The reason we complete a thorough, methodical preflight before you launch is:
- To check for damage, wear, and the overall airworthiness of your glider
- To check that you've completed all necessary steps in setting up your glider and preparing yourself to fly, and
- Because finding and correcting a problem on the ground is much easier than doing so in the air.
In order to launch, we must first prepare ourselves for flight. Every pilot must first decide when to fly. The most important factor in pilot safety is not the level of pilot skill, knowledge or the quality of the pilot's equipment. It is the pilot's attitude. Really good pilots with years of experience and skill and the best equipment get into trouble when they decide they have to fly "no matter what!"
 You must be able to choose not to fly when the conditions are not right for you. As a student, both you and your instructor will make the decision that the conditions are favorable and it's time to fly. You must give the go ahead before you will fly. You must be able to choose not to fly when the conditions are not right for you. As a student, both you and your instructor will make the decision that the conditions are favorable and it's time to fly. You must give the go ahead before you will fly.
Setup is done before your preflight, and includes many things that are reviewed before flight, such as,
- Weather conditions and wind. Continue checking this important factor until launch. Is it really appropraite to fly?
- Glider, riser and line inspection. Look at your gear every time you fly. Look for tears in the canopy, frayed or knotted lines, loose Carabiners on the risers where the lines attach, brake toggle knots, etc.
- Zip up your zippers, check for loose straps and items. All instruments, radios, etc. on lanyards.
- Check the trimmers position on your glider if it has them and adjust for high/low wind.
- Turn on your instruments - Vario, GPS, Radio, Camera, etc. Check battery levels.
- When you are using a reserve parachute, check that it is securely in place and the pin is installed correctly.
- Check Weather again!
- Launch path - Clear and unobstructed? Rotors? Traffic? Anything to avoid? Enough room to launch safely?
Layout
The glider will normally be stored in a backpack. Remove the glider from the backpack and place it on the ground. Unfold the glider so that:
- The upper surface is on the ground and the under surface and lines are facing up.
- Determine the wind direction, if there is any. Best trike weather is NO wind. Always set up the layout DIRECTLY into the wind! Be sure there is no more than 5 mph of wind for your first flights.
- The leading edge and cell openings are farthest from the incoming wind and trike. The trailing edge is closest to the incoming wind and trike.
- Loosely extend the lines towards the trike and clear the lines. Lift the A riser independently of the others. Check to make certain that the A lines lead directly and freely to the leading edge of the wing. Then lift the B riser to check that the B lines lead cleanly to the center of the wing. Finally check the rear riser and brake lines in the same fashion. Attach the risers to the carabiners without twisting them, A's on top facing forward. Repeat with the second riser set.
- Put the lines into the guides located at the 9 and 3 o'clock positions on the paramotor cage. Tension the lines slightly so that they do not get sucked into the propeller.
- Walk around the back side of the glider and arrange the glider in a horseshoe shape using a slight tension to the trike. The glider must be directly behind the trike and centered perfectly. Laying the glider in a horseshoe shape will cause the center lines to load first, making the canopy more stable during inflation.
Bunching the center six feet of the glider under the leading edge encourages the glider to clear the prop blast and come overhead quickly (Butterfly Layout).
- Put on your Helmet! Don't forget to buckle it. Your helmet should always be on before you attach yourself to the trike.
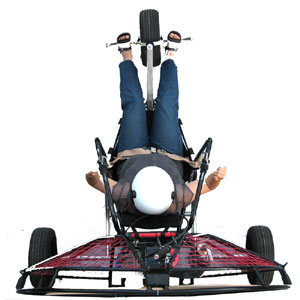
- Sit down on the trike with your feet on the ground to prevent rolling. Buckle the seat belt and tighten to comfort.
- You are now completely hooked into the glider. Be prepared to grab the rear risers and bring the wing down at anytime.
Preflight is as easy as 123-ABCD:
1 - Helmet strap buckled.
2 - Carabiners attached properly to risers.
3 - Harness straps or seat belt attached and buckled.
A - Air conditions, weather check, wind check, no T-storms, appropriate conditions.
B - Being, check pilot's attitude, health, desire, denial.
C - Clear lines, glider laid out, brakes in proper hands, and Clear Air, no pilots approaching.
D - Do a radio check (includes all instruments).
...we won't actually add these to the list, but they are worth reviewing:
E - Take a second or two to ENJOY the fact that you are about to take flight!
F - FLY!!!
The above preflight should take no more than 12 seconds, and should be done before each and every flight. If this preflight takes longer due to anything found and corrected, do it again from the beginning. Say while physically checking "1, 2, 3, A, B, C, D."
 Introducing the Motor Introducing the Motor
The motor shall not be started until directed by instructor and only in the manner directed. The starting sequence will be different for each motor, so this will be shown on an individual basis. We will first start the motor on a flat, unobstructed surface where debris cannot be sucked into the prop.
The preflight for engine starting varies, but shall include checking the throttle to ensure it is in the idle position (not stepped on or squeezed accidentally), engine switch is on, and choke/primed as required.
The preferred method for starting your paramotor is electric start while attached to the trike while you are sitting in it. The next best is is to have someone else pull start while pilot is in the trike, next best is to secure the motor to something solid and last resort is to start alone while holding by the frame. Be prepared for the motor to go to full throttle. NEVER hold by the cage! Statistically, starting the motor is the riskiest thing that a paramotor pilot does.
CHECK THE THROTTLE BY LOOKING AT THE CARBURETOR!!! Make sure the throttle works properly, and is in the IDLE position before starting your paramotor!
Before getting in, make sure the throttle is out of the way. Never reach back towards cage.
Runup
Clear blast area, run up motor RPM to make sure full power is available, test kill switch.
 Trike Practice Trike Practice
We will practice getting the feel of the trike and motor with no wing attached prior to flying the trike with the paramotor. The idea is not to go fast, but to accelerate smoothly while controlling the direction the trike is rolling. Practice looking at the MIRROR - (the wing) and at the intended runway ahead. About 75% of the time, you will be watching the mirror during TAXIing, and the rest watching the intended launch path or runway. Give yourself plenty of room to steer right or left (not confined to a road). Make turns slowly when rolling above 10 mph! Remember, there are NO BRAKES!
Forward Inflation and TAXIing
In the trike, we will only use a forward inflation to bring the glider overhead. We must be sure to inspect the glider for sticks and line tangles before committing to the launch. Therefore, we will be focused on an activity we call "TAXIing" or rolling along after inflating and bringing the glider overhead. This is the most important skill to master. Before we begin flying, we must settle and balance the wing while rolling along at midrange power to be able to continue into a launch and flight. Staying directly under the glider in perfect balance will require: looking up at your glider or using a mirror to see your glider overhead at least once every second or two, gently steering the glider using the brake toggles and steering the trike with your feet to keep the glider centered overhead during TAXIing.
- Find the wind direction by looking at the wind socks you have put in at least three points around where you will be launching and landing. Align the glider so that it will pull up directly into the wind, if there is any. No wind is best for initial trike training, then no more than 5 mph during the novice stages of flying until you know your abilities.
- Layout the glider in a "horseshoe" shape. This will cause the center lines to load first, making the canopy more stable during inflation.
Use our "Butterfly Layout" - that is, pull the center 6 feet of the glider under the leading edge to form a wall. This will force the center of the glider through the prop wash more quickly and often much straighter than a typical wall layout.
- Hook-In - position the trike between your cleared riser sets, with your back to the wing. Lift one riser set, making certain that the A risers remain on top, the Bs in the center and the rear risers on the bottom. Bring the risers over your shoulder (simulating how they will hang when suspended from the flying paraglider). Hook the riser set into the carabiner. Repeat for both sides.
- Position the trike in front of your glider with the risers and lines evenly tensioned against the trike hang point. Keep the trike from rolling backwards in order to keep light tension on the lines.
- Clear your lines. Lift one riser set. Observe that the brake line runs clearly from the rear riser to the wing and cleanly through the pulley on the rear riser. Remove that brake and hold onto it. Repeat with the second riser set.
- A Assist. If using the TrikeBuggy A-Assists, skip this step, as they will be doing this work for you! Reach under each of the riser sets and grasp the inner A riser, just below the lines attachment point in each hand. Lift the A risers and observe that the lines go directly from your hand to the wing with no other lines crossing over them.
- Power Up - You will typically use full throttle to inflate and bring the wing overhead. As you apply power, you will push the A risers upwards over your shoulders. Do not pull down or forward on the risers! Just push UP! Don't back all the way off on the throttle when the wing comes into view on your mirror. If you stop accelerating to look up at your wing, it could fly past you and collapse. It will also lose internal pressure and be hard to control. Always keep pressure from the trike to the risers by moving forward (applying moderate power).
- Contact - When the glider is overhead and you can see it in the mirror, release the A's and apply contact to the brakes. Continue checking it to stay directly below the center while easing the throttle to about 1/2 - just enough to keep the forward motion necessary to keep the wing overhead, but not enough to launch.
- Inspect the glider to make sure to make sure there are no sticks or knots in the lines and that everything is free and clear. If there is any problem immediately pull the brakes down as far as you can and stop the engine. This should bring the glider back to the ground.
- Taxi - If everything is clear then keep TAXIing along your launch path. Use short downward pulls on the brakes and foot steering to keep the paraglider overhead as you TAXI. You must keep looking at your glider in the mirror! There is no way to "feel" the glider in the trike, and if you do not continue checking that you are balanced while TAXIing, the wing will soon be off to the side. If this continues, the wing will suddenly roll the trike over onto its side, potentially damaging you and the motor.
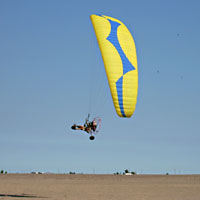
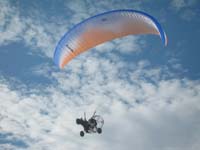
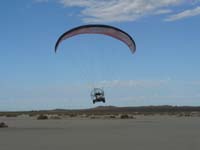
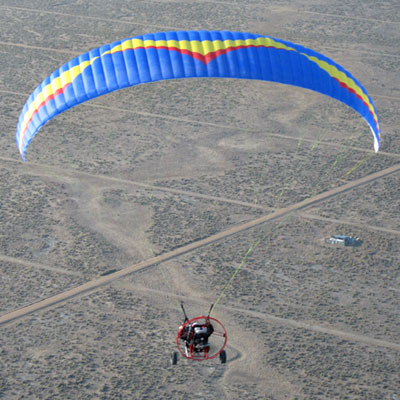
- Launch - If the glider is settled and balanced overhead with little or no brake applied, throttle up gently to full and keep watching the glider to ensure balance during liftoff. Once you have lifted off and are flying, look ahead of you at the intended flight path and gently guide the glider in flight. Once the trike is airborne, gravity takes over and balances the aircraft as it flies.
Recap: Launch is divided into three phases - Inflation, TAXI, launch. Only continue from one phase to the next if the glider is balanced and controlled.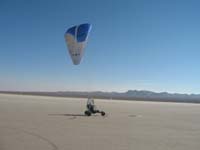
Flying the TrikeBuggy
A good launch will have the pilot demonstrate proper launch procedure including inflation, contact, TAXIing and liftoff. We will practice this sequence repeatedly, paying attention to keeping smooth application of the throttle throughout. Caution must also be exercised not to accidentally apply the kill switch during this process.
There is also a risk of the brake toggles getting into the propeller, we will check to make sure the brake length is correct. You will practice keeping the front wheel straight for landing. You will also practice finding and using the kill switch, and if possible, a secondary method to shut off motor. You will rehearse inflation, contact, TAXIing, launch, climb, turns, approach, landing and flare with the motor running.
We will be using a radio during the simulator process to ensure that you can hear our instruction clearly even at high power. It is imperative that you are able to respond correctly to verbal communication with the motor running. If the radio fails, visual response to our signals may include: Yes or positive response - nodding forward and back with your head; No or negative - moving head side to side. Our signals may include: Hands up - ease the brakes up higher; One hand back and forth across neck - cut the power; Two hands vertical and parallel from instructor to student - come this way; Hands out to side - do landing sequence, come down!
Great caution must be used to remember to release the brake toggles smoothly and completely after a turn to be sure not to pull the brakes too deeply. Anytime the brakes are pulled beyond a certain point, you risk a stall or spin of your paraglider.
Launching: Three Phases - Inflation, TAXI, Launch!
Inflation
Inflation is done first to get the glider through the prop wash and overhead into the flying position as quickly as possible. A slow inflation will often "waddle" around and end up coming overhead to one side or the other. We will often use full throttle to get the glider overhead, then back off to approximately 3/4 power or "Flutter" throttle to settle and balance the wing before liftoff.
TAXI
As soon as you have visual contact of the wing, release the "A" risers and begin toggle control. Be careful - deep toggle control will result in overcontrol! Use quick jabs when TAXIing, also using the trike foot steering control to balance under the glider.
It is quite common to overcontrol the glider that is off to one side AND steer the trike to correct it. This often results in a brief second or two of seemingly OK balance, but beware - the wing is again on a different runway then the trike! Once it passes the middle point and goes to the other side, if there has been enough acceleration from you thinking this is in balance, then the wing will tip the trike over!
The key is to back off on the power enough to keep the glider overhead: not enough to allow the glider to fall behind, and nott too much tol cause the accidental launch or emergency takeoff so common to new PPG Trike pilots. Early recognition and input will dramatically improve your control of the canopy during the TAXI run. If you wait to see if it is really out of balance, it will often be too late to fix it.
 The Flutter The Flutter
Often, a new technique we have developed called the "Flutter" will help pilots stay in this TAXI without launching mode. To do this, simply flutter the throttle at about one-half second intervals (ONE thousand ONE pause, ONE thousand TWO pause, ONE thousand THREE pause, etc.) to keep the trike rolling forward, pulling the glider. It is impossible to launch while doing this, and even though it sounds like the pilot is tentative and a little wild, the method works well especially with the more powerful motors. Smaller motors may have to keep near full throttle in order to TAXI, or they may be too slow.
The glider and trike MUST be settled, balanced and on the SAME runway in order to proceed into a launch. Sometimes, this only takes a second to recognize. A good TrikeBuggy pilot often makes the process look easy, but they are sure the wing is there in balance before they fly.
Imbalanced TAXI runs that are forced into the air with full throttle often result
in an "Accidental Launch" or an "Emergengy Takeoff", but quite often these will go bad and simply become accidents and emergencies. We can't emphasize this enough! We see a lot of PPG Trike pilots getting away with bad launch techniques, and they are just accidents waiting to happen. Take time to master this!
If there is any breeze, then TAXIing into the wind helps slow the process. The resulting ground speeds are lower, and safer close to the ground. The headwind will also help to inflate the glider.
If you TAXI with the paraglider in no wind at 10 mph, the glider's airspeed and groundspeed is 10 mph. If there's a 5 mph headwind, and you TAXI with the paraglider at 10 mph, the glider's airspeed increases to 15 mph while your groundspeed remains 10 mph.
 Launch Launch
When launching, apply power smoothly to the glider. Do not continue into a launch unless the wing is perfectly balanced overhead during the TAXI run. If you apply too much brake while TAXIing, you may slow the glider down and cause it to fall behind you.
Make the transition from TAXIing to flying as smooth as possible. Accelerate smoothly to full power over two to three seconds.
Keep accelerating and checking for balance until you are well into the air. The glider could set you down again. Steer the glider straight as you continue to power forward until you are completely airborne. Once airborne, gravity takes over - balancing the glider perfectly overhead.
Flying
The speed at which a paraglider will tend to fly when no pilot input is given (brakes in the full up position) is called trim speed. This is the speed the glider is 'trimmed' at.
Pulling both of the brakes down together will slow the glider. Pulling one brake will turn the glider in that direction.
 In turbulent air it is useful to keep a slight pressure on the brakes. However, whether turning or simply tensioning the brakes, do not pull the brakes down too deep. This could result in the wing stalling and you falling. In turbulent air it is useful to keep a slight pressure on the brakes. However, whether turning or simply tensioning the brakes, do not pull the brakes down too deep. This could result in the wing stalling and you falling.
A common mistake for students is to pull one brake down, complete the turn and forget to release the brake tension before they begin another turn. If this is continued through several turns, it could result in both brakes being pulled down to a position that could stall the glider. Therefore, consciously release the tension on your turning brake before you begin another turn.
Your first flights will be radio controlled by your instructor. Listen carefully to the instructions. Your flight may be buoyant and you may need to make complete left and right turns to burn off altitude so you can land well within the landing zone.
Touch & Go
Before we actually practice this valuable process, we must learn to use the throttle efficiently. TO do this, we will practice flying at around 20 feet above the ground for extended periods. You will be surprised at how challenging this will be at first! Only when we have mastered the pitch control of our aircraft using the throttle and not the brakes can we proceed into actually touching down again. Practice more of this by lowering the aircraft to 10 feet high fly-bys of the landing field. Master the throttle control - ease the power on and off without surging the trike. When we have done many of these low flying landing approaches, then we can continue to actually landing.
Landing
Landing into the wind is a good idea because the head wind will result in slower ground speeds. Slower ground speeds at landing are safer and reduce the speed you land with as you flare. Landing directly into the wind is especially important in a trike, since you cannot move sideways with wheels.
When on final landing approach, if you notice that you are traveling partly sideways to your right over the ground, you should gently steer left to bring your heading into the wind. If you are traveling sideways to the left, you should gently steer right to bring your heading into the wind. Do not land until you are sure you are facing directly into the wind. If necessary, go around again and do another approach.
Throttle Landing
A throttle landing is done by simply easing off the throttle from the fly-by position to allow the trike to descend VERY slowly. If you releasse the throttle completely or all at once, the trike will surge under the wing as they try to equalize again. An almost imperceptable decrease in throttle will allow the trike to gently descend to the ground and give you a smooth landing. Using a touch of toggle pressure to round out the landing (combination of throttle and flare landings) will often result in the best landings.
 Flare Landing with Engine Off (deadstick) Flare Landing with Engine Off (deadstick)
To land smoothly without engine power, make sure you kill the motor at a sufficient altitude over the ground so that the aircraft balances out after the thrust has stopped (around 100 feet). Allow the paraglider to fly at trim speed (hands up) so there will be some forward energy in the aircraft to do a good flare landing.
When you are about 10 feet above the ground you should be prepared to land. Keep the front wheel straight for landing with gentle pressure with your legs. When landing (approximately 3 feet above the ground), you will flare the glider by progressively pulling the brakes down under the seat (be careful not to put your hands under the wheels!). Roll into landing while holding the flare, letting the glider slow you down. Do not jam the brakes quickly or the glider may temporarily lift, then drop you.
If you find that as you flare, the glider starts to lift, hold the flare where it is, then proceed and flnish the flare when the descent begins again. If you let off on a partially flared glider, the wing will surge you into the ground quite hard! After a few landings, you will get the feel of the timing needed to produce a good flare landing. Touch & Go!
Once you have mastered the throttle, and its smooth application both increasing and decreasing power, then you are ready to do repeated touch and go practice. This is very important: While flying, we look ahead and around us at where we are going. When TAXIing, we look at the MIRROR! We will also look up at the runway every second or two, but we must shift our attention back to the wing's balance overhead once we have touched down and are rolling again. This is done by LOOKING AT THE MIRROR! Remember, there is no way to "feel" the glider in a trike, so we must balance it based on our visual input.
Coming to a Stop
After landing, you must immobilize the canopy. Continue your flare and hold the toggles under your seat to let the glider and friction slow you down. The wing should fall behind you. If there is strong wind, it may be best to grab the rear risers and pull them towards you. 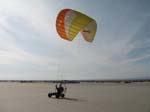 Care of the Glider Care of the Glider
Once the paraglider is down, stow the brakes in their clips on the risers with lines clear. Get out of the trike and disattach the glider from the trike. Gather the canopy by placing all of the lines in your left hand, just above the risers. Slide down the lines with your right hand, fully extending your arms away from each other. Then bring your hands together, forming a loop of lines. Place this loop of lines in your left hand with the others.
Continue gathering the glider in this way, never letting go of the lines in your left hand. Lift gently as you approach the glider, until you have gathered right to the fabric. Now you can lift the glider, sling it over your shoulder, and walk with it without dragging or stepping on it.
Emergencies
In case the trike rolls over due to imbalanced TAXI run, overcontrolled foot steering or landing bounce - Do not put hands out to try to stop the rollover! Keep your hands and feet tucked in, away from the wheels, trike frame and motor frame and cage. Likely, the trike will protect you from damage, although there may be some damage to the machine or trike. Broken trike parts are better than broken body parts!
Rehearse recognizing parachutal stall (wing goes back and headwind dies off) and correcting (hands up, reduce power).
Rehearse what to do in case of unexpected pendulum (nothing), and how doing nothing will allow it to dampen out on its own. While it is good to practice pendulum correction up high, it has proven beneficial to NOT have the student try correcting it during landing. The dampening action (pulling brake in the direction of swing’s start) is completely counterintuitive to a new pilot.
Rehearse reserve use (as installed): "Kill, Look, reach, pull, look, throw." Use dummy reserve if available.
Rehearse steering options in case of brake line or pulley failure: Rear riser turn, weight shift, differential trimmers.
Rehearse what to do in case of spin or riser twist (reduce power, hands up). Reemphasize that this can happen with too much or too quick brake.
Rehearse what to do in case of wing collapse (hands up, then SMOOTHLY control the direction).
 Control Control
We will practice these aspects of glider and motor control:
- TAXI, TAXI, TAXI!!! Most of our practice will be on this single most important skill. If you have good inflations and can TAXI flawlessly, launching and flying will be the easy part!
- Rehearse controlling pitch with brakes, emphasizing smooth application and maximum pull position.
- Rehearse surging with power and go over wing reaction to power changes.
Emphasize smooth application.
- Point out torque effect and explain why to avoid turning against it.
- Rehearse student reaction to commands (brakes, throttle and kill switch).
- Brake position/pressures while in flight including maximum safe pull positions.
- Flare and Landing.
Solo Flight Briefing
Student should know what to do for the entire flight in case radio communications break down. This is intended to be done immediately before the flight.
- Flight Plan including launch, flight pattern and landing.
- Establish how the Instructor will call an abort or go.
- Have student show what the established visual signals are.
- Have student explain and motion (as able) emergency procedures (Motor failure, Steering failure, Parachutal stall)
- Have student explain the pattern and landing including when to shut of motor.
Solo Flight
This will be your first solo flight under power. Here is how we would like the sequence to progress:
- Run up - warm up the engine.
- Preflight - 123ABCD.
- Inflation with good control of the wing.
- TAXI - check your wing every second or two to stay balanced below the glider - do not proceed if not under control.
- Good launch sequence - smooth application of power, focus on balance and runway.
- Climb to safe altitude (at least 200’ recommended).
- Practice shallow turns as directed including at least one 360 degree turn (if able).
- Throttle into level flight, descent and back into climb.
- Direct the flight as necessary, call out when to shut off motor, when to flare.
Keeping a Logbook
It is expected that the student will keep a log that records at least the date, location, motor, trike, wing, flights and maneuvers performed for each day of flying. During your training, we expect each student to record their information on our student log sheet, and upon completion of certification, the logbook may be duplicated for the student. We provide a sample log that can be copied for your use. Many pilots use an online service or database (Excel, D-Base) for their logbook. Make a habit of keeping your logbook current, as this will be used as a basis for advancing in the USHPA or USPPA rating system.

|